Mar 7, 2025

PyFlow.ts: Bridging ML Research with Production Using a Single Decorator

Discover how PyFlow.ts eliminates the "last mile" problem in ML deployment by connecting Python ML models to TypeScript frontends with minimal code.

Marius Constantin-Dinu

Share this article

Integrating ML Research with Production: The PyFlow.ts Approach

In the world of machine learning and AI, there's a familiar pain point that haunts both researchers and engineers: the transition from experimental code to production-ready applications. As an ML researcher, I've spent countless hours developing elegant algorithms and models, only to face the frustrating reality of having to rewrite everything into a web-friendly format, complete with API layers, type definitions, and client-side code.

This "last mile" problem has been a persistent thorn in our industry's side. That's why I created PyFlow.ts, a lightweight bridge between Python and TypeScript that eliminates the friction and boilerplate code typically required to connect ML models to frontend applications.

The ML Deployment Problem

Let me paint a familiar picture:

You've spent weeks training a sophisticated machine learning model. It works beautifully in your Jupyter notebook. The results are promising, and you're excited to deploy it as part of a web application. Then reality hits:

  1. API Development: Writing a REST API with proper endpoints, request/response models, and error handling

  2. Type Safety: Manually translating Python types to TypeScript interfaces

  3. Client Generation: Creating client-side code that communicates with your API

  4. Documentation: Keeping API specs and clients in sync

  5. Maintenance: Managing changes as your model evolves

For many data scientists and ML engineers, this process is not just tedious—it's a complete context switch from the creative modeling work they excel at. Each of these steps requires specialized knowledge and adds days or weeks to the development cycle.

Small development teams are hit especially hard. They often lack dedicated API specialists and frontend developers who can bridge this gap efficiently.

Enter PyFlow.ts: Bridging the Python-TypeScript Divide

PyFlow.ts is designed to solve exactly this problem through a radically simple approach: just add a decorator.

Here's a simple example:

# Python ML code
from pyflow import extensity

@extensity
def predict_sentiment(text: str) -> Dict[str, float]:
    # Your sophisticated ML code here
    scores = model.predict(text)
    return {
        "positive": float(scores[0]),
        "negative": float(scores[1]),
        "neutral": float(scores[2])
    }

@extensity
class TextAnalyzer:
    def __init__(self, model_name: str):
        self.model = load_model(model_name)
    
    def analyze(self, documents: List[str]) -> List[Dict[str, any]]:
        return [self.analyze_single(doc) for doc in documents]
        
    def analyze_single(self, document: str) -> Dict[str, any]:
        # Complex document analysis
        return {
            "sentiment": predict_sentiment(document),
            "entities": self.extract_entities(document),
            "summary": self.summarize(document)
        }

That's it. No API routes, no serialization code, no OpenAPI specs to maintain. Just Python code with type annotations and a simple decorator.

On the TypeScript side, you simply use the generated code:

import { predict_sentiment, TextAnalyzer } from './generated';

// Use functions directly
const sentiment = await predict_sentiment("I love this product!");
console.log(sentiment); // { positive: 0.92, negative: 0.02, neutral: 0.06 }

// Or instantiate classes
const analyzer = new TextAnalyzer("bert-base-uncased");
const results = await analyzer.analyze(["First document", "Second document"]);

Behind the scenes, PyFlow.ts:

  1. Inspects your Python code and type annotations

  2. Generates a FastAPI backend server

  3. Creates TypeScript type definitions and client code

  4. Handles serialization, API communication, and type conversion automatically

Beyond Basic Integration: Advanced Features

While the simple decorator pattern is powerful on its own, PyFlow.ts offers advanced features that make it suitable for complex applications:

1. Custom Type Mappings

PyFlow.ts automatically maps Python types to TypeScript types. Common mappings include:

Python Type

TypeScript Type

str

string

int, float

number

bool

boolean

list[T], List[T]

T[]

dict[K, V], Dict[K, V]

Record<K, V>

tuple, Tuple

Array or typed tuple

Union[T, U]

T | U

Optional[T]

T | null

Classes

Classes with the same name

You can also define custom classes with type annotations that are automatically converted to TypeScript classes:

@extensity
class ImageAnalysisResult:
    confidence: float
    bounding_boxes: List[Dict[str, float]]
    detected_objects: List[str]
    processing_time_ms: int

@extensity
def analyze_image(image_data: bytes) -> ImageAnalysisResult:
    # Image analysis code here
    return result

This generates properly defined TypeScript interfaces:

class ImageAnalysisResult {
  confidence: number;
  bounding_boxes: Array<Record<string, number>>;
  detected_objects: string[];
  processing_time_ms: number;
  ...
}

async function analyze_image(image_data: Uint8Array): Promise<ImageAnalysisResult> {
  // API call generated automatically
}

2. Class Inheritance

PyFlow.ts respects Python class inheritance and generates the appropriate TypeScript classes:

@extensity
class BaseModel:
    model_id: str
    version: str
    
    def get_metadata(self) -> Dict[str, Any]:
        return {"id": self.model_id, "version": self.version}

@extensity
class LanguageModel(BaseModel):
    vocabulary_size: int
    context_length: int
    
    def generate_text(self, prompt: str) -> str:
        # Implementation
        pass

3. Directory Scanning

For larger projects with multiple Python modules, PyFlow.ts can recursively scan directories:

# Process all Python files in a directory and initialize inner typscript project
pyflow init -m ./your_ml_package -o ./generated

# Process all Python files in a directory and generated only the classes
pyflow generate -m ./your_ml_package -o ./generated

# Run server for all modules
pyflow run -m

This is particularly useful for maintaining organization in larger ML projects while still having a unified API.

Why This Matters for ML Teams

Traditional approaches to connecting Python ML models to TypeScript frontends involve:

  1. REST APIs: Developing a FastAPI/Flask/Django API, creating OpenAPI specs, and generating clients

  2. gRPC: Writing protocol buffers, generating stubs, and handling streaming

  3. WebSocket solutions: Building real-time communication layers

  4. Custom solutions: Creating bespoke integration points

Each of these approaches requires significant engineering effort—often days to weeks of work—and specialized knowledge that many data scientists and ML researchers don't have.

PyFlow.ts collapses this work into minutes. Add decorators, run a command, and you're done.

Real-World Applications of PyFlow.ts

The power of PyFlow.ts truly shines when applied to real-world ML problems. Let's explore some common use cases:

1. Computer Vision Applications

ML researchers working on computer vision can rapidly build web interfaces for their models:

@extensity
class ObjectDetector:
    def __init__(self, model_name: str):
        self.model = load_model(model_name)
    
    def detect_objects(self, image_bytes: bytes) -> List[Dict[str, Any]]:
        # Convert bytes to image
        # Run detection
        # Return results with bounding boxes, labels, confidence
        pass

    def track_objects(self, video_frames: List[bytes]) -> List[Dict[str, Any]]:
        # Track objects across frames
        pass

With this simple implementation, frontend developers can immediately build interactive UIs like:

  • Drag-and-drop image analysis tools

  • Live webcam object detection

  • Video processing dashboards

2. Natural Language Processing Pipelines

NLP researchers can expose complex language processing pipelines to web applications:

@extensity
class DocumentProcessor:
    def summarize(self, text: str, max_length: int = 100) -> str:
        # Generate summary
        pass
    
    def extract_entities(self, text: str) -> List[Dict[str, Any]]:
        # Extract named entities
        pass
    
    def analyze_sentiment(self, text: str) -> Dict[str, float]:
        # Analyze sentiment
        pass

3. Financial Analysis and Algorithmic Trading

For FinTech applications, PyFlow.ts bridges the gap between complex financial models in Python and interactive trading interfaces:

@extensity
class PortfolioOptimizer:
    def optimize_allocation(self, assets: List[Dict], constraints: Dict) -> Dict[str, float]:
        # Run optimization algorithms
        # Return optimal allocations
        pass
    
    def simulate_returns(self, allocations: Dict[str, float], scenarios: List[Dict]) -> Dict[str, Any]:
        # Run Monte Carlo simulations
        # Return expected returns, risks, etc.
        pass

Case Study: Building a Smart Notes App

To demonstrate the full power of PyFlow.ts, let's build a complete application: a smart notes app with AI-powered suggestions. This example showcases how seamlessly ML features can be integrated into a web application.
The full app is available here.

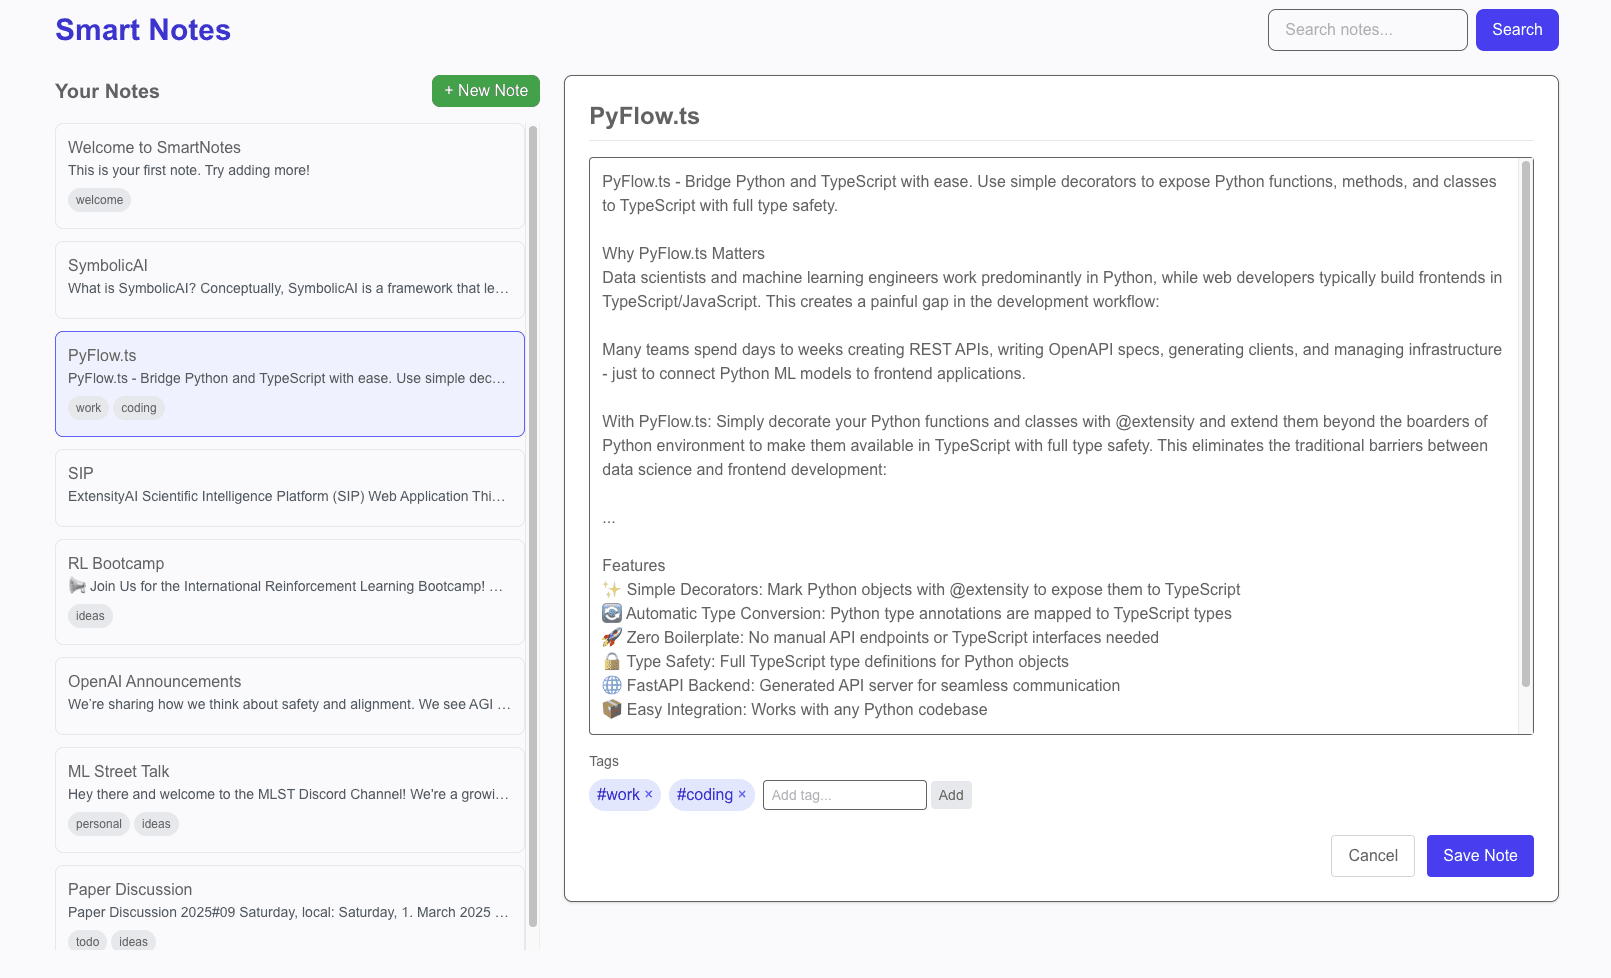
Here's what our app will include:

  • A smart notes app that provides ML-powered suggestions based on your notes

  • Automatic categorization and tagging

  • Semantic search capabilities

Let's start with our Python backend:

# notes_backend.py
from pyflow import extensity
from typing import List, Dict, Optional
import datetime
import uuid
import numpy as np
from sentence_transformers import SentenceTransformer

# Simple in-memory database for demo
notes_db = {}
embeddings_db = {}
model = SentenceTransformer('all-MiniLM-L6-v2')

@extensity
class Note:
    id: str
    title: str
    content: str
    created_at: str
    updated_at: str
    tags: List[str]

@extensity
class NotesManager:
    def __init__(self):
        # Initialize with some example data if empty
        if not notes_db:
            self.add_note("Welcome to SmartNotes", "This is your first note. Try adding more!", ["welcome"])
    
    def add_note(self, title: str, content: str, tags: Optional[List[str]] = None) -> Note:
        now = datetime.datetime.now().isoformat()
        note_id = str(uuid.uuid4())
        
        note = {
            "id": note_id,
            "title": title,
            "content": content,
            "created_at": now,
            "updated_at": now,
            "tags": tags or []
        }
        
        notes_db[note_id] = note
        # Store embedding for semantic search
        embeddings_db[note_id] = model.encode(content)
        
        return note
    
    def get_notes(self) -> List[Note]:
        return list(notes_db.values())
    
    def search_notes(self, query: str) -> List[Note]:
        query_embedding = model.encode(query)
        
        # Calculate similarity scores
        scores = {}
        for note_id, embedding in embeddings_db.items():
            similarity = np.dot(query_embedding, embedding) / (np.linalg.norm(query_embedding) * np.linalg.norm(embedding))
            scores[note_id] = similarity
        
        # Sort by similarity score
        sorted_notes = sorted([(notes_db[note_id], score) for note_id, score in scores.items()], 
                             key=lambda x: x[1], reverse=True)
        
        # Return just the notes (not the scores)
        return [note for note, _ in sorted_notes]

@extensity
class SmartSuggestions:
    def suggest_tags(self, content: str) -> List[str]:
        # In a real app, this would use a more sophisticated ML model
        # For demo purposes, we'll use a simple keyword-based approach
        common_topics = {
            "work": ["meeting", "project", "deadline", "task", "client", "report"],
            "personal": ["family", "friend", "vacation", "weekend", "birthday"],
            "ideas": ["idea", "thought", "concept", "innovation", "creative"],
            "todo": ["todo", "task", "remember", "don't forget", "reminder"]
        }
        
        content_lower = content.lower()
        suggested_tags = []
        
        for tag, keywords in common_topics.items():
            if any(keyword in content_lower for keyword in keywords):
                suggested_tags.append(tag)
                
        return suggested_tags
    
    def suggest_continuation(self, content: str) -> str:
        # In a real app, use an LLM API for completions
        # This is a simplified placeholder
        if "meeting" in content.lower():
            return " I need to prepare the following agenda items..."
        elif "idea" in content.lower():
            return " This concept could be developed further by..."
        else:
            return " I should expand on this by adding more details about..."

Now, let's initialize PyFlow.ts to generate our TypeScript code. If you use our tutorial code you can do the following:

# Create the project directory and initialize PyFlow.ts
git clone https://github.com/ExtensityAI/PyFlow.ts.git
cd PyFlow.ts/examples/smart-notes-app

# install packages and dependencies
pip install -r requirements.txt
npm install

# open a new terminal tab and run PyFlow.ts service
cd src/backend
pyflow init -m ./ -o ./generated
pyflow run -m ./ -g ./generated

# run frontend app from smart-notes-app root
npm

With this single command, PyFlow.ts generated all the TypeScript interfaces, API client code, and backend server code we need. Now we can create our Next.js frontend that leverages these ML capabilities:

// frontend/app/page.tsx
"use client";

import { useState, useEffect } from 'react';
import { Note, NotesManager, SmartSuggestions } from './generated/notes_backend';
import NoteCard from '../components/NoteCard';
import NoteEditor from '../components/NoteEditor';

export default function Home() {
  const [notes, setNotes] = useState<Note[]>([]);
  const [selectedNote, setSelectedNote] = useState<Note | null>(null);
  const [isEditing, setIsEditing] = useState(false);
  const [searchQuery, setSearchQuery] = useState('');
  
  const notesManager = new NotesManager();
  const smartSuggestions = new SmartSuggestions();
  
  // Load notes on component mount
  useEffect(() => {
    loadNotes();
  }, []);
  
  async function loadNotes() {
    const fetchedNotes = await notesManager.get_notes();
    setNotes(fetchedNotes);
  }
  
  async function handleSearch() {
    if (searchQuery.trim()) {
      // Use the ML-powered semantic search
      const results = await notesManager.search_notes(searchQuery);
      setNotes(results);
    } else {
      loadNotes();
    }
  }
  
  // ... more UI interaction methods ...
  
  return (
    <main className="min-h-screen bg-gray-50">
      {/* UI components ... */}
    </main>
  );
}

Our note editor component can directly use the ML services for tag suggestions and content continuation:

// Excerpt from NoteEditor.tsx
useEffect(() => {
  const getSuggestions = async () => {
    if (content.trim().length > 10) {
      // Call ML-powered tag suggestion
      const suggestions = await smartSuggestions.suggest_tags(content);
      setSuggestedTags(suggestions.filter(tag => !tags.includes(tag)));
      
      // Get continuation suggestion if content ends with a period
      if (content.trim().endsWith('.') && content.trim().length > 50) {
        const continuation = await smartSuggestions.suggest_continuation(content);
        setContinuationSuggestion(continuation);
        setShowContinuationSuggestion(true);
      }
    }
  };
  
  const delayDebounce = setTimeout(getSuggestions, 1000);
  return () => clearTimeout(delayDebounce);
}, [content]);

Performance Considerations and Best Practices

As you build more complex applications with PyFlow.ts, keep these performance considerations and best practices in mind:

1. Structure Your Python Code for Clarity

Organize your ML code into cohesive classes with clear responsibilities:

# Instead of this
@extensity
def preprocess(data): pass

@extensity
def run_model(data): pass

@extensity
def postprocess(results): pass

# Do this
@extensity
class PredictionPipeline:
    def preprocess(self, data): pass
    def predict(self, preprocessed_data): pass
    def postprocess(self, predictions): pass
    
    def run_end_to_end(self, data):
        preprocessed = self.preprocess(data)
        predictions = self.predict(preprocessed)
        return self.postprocess(predictions)

2. Use Type Annotations Extensively

The quality of your TypeScript classes depends on your Python type annotations:

# Poor - vague types lead to 'any' in TypeScript
@extensity
def analyze(data):
    return result

# Better - explicit types create precise TypeScript interfaces
@extensity
def analyze(data: List[Dict[str, float]]) -> Dict[str, Any]:
    return {
        "predictions": [...],
        "confidence": 0.95,
        "processing_time": 120
    }

3. Optimize Data Transfer

Remember that all function calls between TypeScript and Python happen over HTTP. For large data transfers:

  • Use batching for multiple operations when possible

  • Consider binary formats for large datasets

  • Use compression for text data

For example:

// Less efficient - multiple HTTP calls
for (const item of items) {
  await processItem(item);
}

// More efficient - single HTTP call
await processItems(items);

4. Leverage State Management

PyFlow.ts automatically maintains state for class instances, allowing you to build stateful applications easily:

// Create an instance that maintains state
const analyzer = new TextAnalyzer("bert-base-uncased");

// These method calls use the same cached instance
await analyzer.analyze(doc1);
await analyzer.analyze(doc2);  // Has access to previous state

5. Handle Errors Gracefully

Make sure your Python code handles errors properly, as they'll be transmitted to the TypeScript side:

@extensity
def process_data(data: Dict) -> Dict:
    try:
        # Process data
        return result
    except KeyError as e:
        # Convert to a more user-friendly error
        raise ValueError(f"Missing required field: {str(e)}")
    except Exception as e:
        # Log detailed error server-side
        logger.error(f"Processing error: {str(e)}")
        # Return friendlier message to client
        raise RuntimeError("Data processing failed. See server logs for details.")

PyFlow.ts vs Traditional Approaches

When comparing PyFlow.ts to traditional integration approaches, the benefits become clear:

Feature

PyFlow.ts

REST API

gRPC

Custom Solutions

Development Time

Minutes

Days to Weeks

Days to Weeks

Weeks to Months

Code Generation

Automatic

Manual/OpenAPI

Proto Buffers

Custom

Type Safety

Full

Partial

Full

Varies

Boilerplate Code

Minimal

Extensive

Moderate

Extensive

Learning Curve

Low

Moderate

High

High

API Documentation

Auto-generated

Manual/OpenAPI

Proto Files

Custom

State Management

Built-in

Manual

Manual

Varies

Code Maintenance

Low

High

Moderate

High

Looking to the Future: Roadmap and Development

While PyFlow.ts already solves many problems, if you like and support our work we have concepts already mapped out for expanding its capabilities:

  • WebSocket Support: For more efficient bidirectional communication

  • Batch Processing API: Optimized for high-throughput workloads

  • Edge Deployment Options: Including potential WASM compilation for certain use cases

  • Enhanced Type Mapping: Supporting more complex Python types and generics

Vision: Model-Driven Development with LLMs

Perhaps the most exciting potential is in model-driven development with large language models (LLMs) and vision language models (VLMs).

As we increasingly use AI to generate code, the simpler our frameworks are, the more likely the AI will generate correct code. With PyFlow.ts, an LLM only needs to generate the core Python and TypeScript logic, not all the complex API and integration layers.

This drastically increases the likelihood that LLM-generated code will work on the first try, enabling entire applications to be fully generated and raised from prompt to production with minimal human intervention.

Getting Started with PyFlow.ts

Ready to try PyFlow.ts on your own projects? It's as simple as:

Then decorate your Python functions and classes:

from pyflow import extensity

@extensity
def your_ml_function(input_data: dict) -> dict:
    # Your ML code here
    return result

Generate the TypeScript code:

pyflow init -m your_module -o

And use it in your frontend:

import { your_ml_function } from './generated';

// Now use it like any TypeScript function
const result = await your_ml_function(inputData);

PyFlow.ts is open source and available on GitHub: ExtensityAI/PyFlow.ts

Join the ExtensityAI Community

One of the most exciting aspects of PyFlow.ts is the growing community of ML practitioners and web developers collaborating more effectively.

Here's how you can get involved:

  1. Star the GitHub repository: Help others discover PyFlow.ts

  2. Share your use cases: We're collecting examples of PyFlow.ts in production

  3. Contribute: Whether it's documentation, bug fixes, or new features

  4. Join our Discord: Connect with other developers using PyFlow.ts

Conclusion

The "last mile" problem in ML deployment has been a persistent friction point that has slowed innovation and limited the impact of AI research. With PyFlow.ts, I wanted to create a lightweight solution that would eliminate this friction entirely.

By allowing Python code to be directly exposed to TypeScript with full type safety, PyFlow.ts bridges the gap between research and production, enabling ML teams to focus on what they do best: creating amazing models and delivering value to users.

Whether you're a solo ML researcher looking to showcase your work, a startup trying to ship your first ML-powered product, or an enterprise team bridging the gap between research and production, PyFlow.ts can help you focus on what matters—creating value with machine learning—rather than the infrastructure that connects it all together.

Give it a try, and let me know what you build with it!

Marius-Constantin Dinu is the creator of PyFlow.ts and co-founder of ExtensityAI. You can find me on Twitter, LinkedIn, or at my personal website.

The future of AI
Available today

The future of AI
Available today

The future of AI
Available today